Instant Gratification

It is no surprise that weavers have incredible patience, we by nature have to be the kind of person to whom process, no matter how slow, is the whole point. I will sit patiently threading 1000 ends, or painstakingly plod along following a complex treadling sequence, or methodically develop a new weaving draft. In garment making I relish the joy of a series of perfect bound buttonholes, a seam well sewn, a zipper perfectly installed. I’m not a stranger to ripping out, unweaving, or starting over.

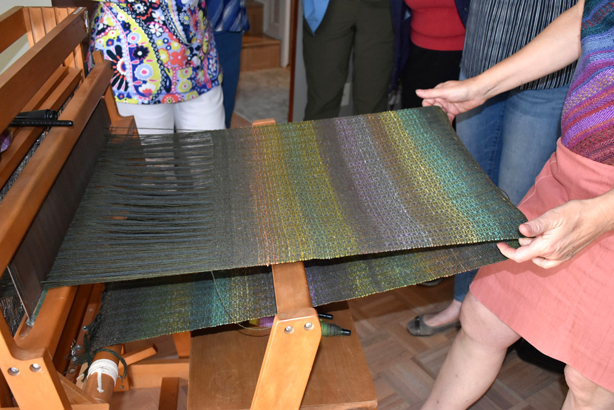
I started this 3 color Baltic Pick up based on a new book I got from Annie MacHale. It is soooo slow. But with patience, I’ll get faster and really be able to follow the pick up sequence. I might edit the graph to be more in the way I like to follow pick up. Another few hours of work. No problem.

I just finished the third virtual conference in a month. I taught at the first one, the MAFA conference, but also took some classes, and I attended the second and third, the ASG conference with the American Sewing Guild, and yesterday and today, NEWS, that’s the New England Weavers Seminar. The second two were a series of lectures open to all those who signed up. I’m pretty cross eyed from all the Zoom meetings but the wealth of information and inspiration I’ve immersed myself in this past month has felt like I earned a 2 year college degree. So many techniques to explore and think about and appreciate.

When I come across something that makes my heart sing that took no effort at all, I almost feel like I’m cheating. It can’t be that easy…

I’d listened to ice dyeing programs and lectures before and was really curious about the spontaneity. There is nothing spontaneous about anything I do in the studio. Can you achieve anything decent from just tossing cellulosic fibers into a basin, tossing on ice and then some fiber reactive dye and get something that doesn’t look like you did the craft project du jour?

I listened to Jessica Kaufman in a two hour class I signed up for at the MAFA conference. This past week was the first chance I’d had to actually try this. I thought you needed a lot more equipment, set up, whatever. I thought as everything in fiber turns out to be, it would be way more complicated. Jessica is with Waxon studio, and she is obviously a pro at this technique and teaching it, and teaching it online.

I watched the replay mid week before the replays expired, and decided to gather up some yarn, fabric, scarves and an old vintage cotton napkin that I can’t imagine why was in my stash. The yarns were probably cotton, the scarves rayon, and the fabric a couple yards of rayon challis.

All I needed was some buckets, and some ice. Yes, I presoaked overnight, all the fibers in Soda Ash. I keep that in the studio because I regularly dye yarn with Fiber Reactive Dyes. Then I just scrunched stuff up, secured with rubber bands, and laid gently in hospital tubs. I acquired a huge amount of them during my husband’s long illness. The only thing positive about an extended hospital stay is the great tubs they give you.

I picked up a bag of ice at the grocery store, sprinkled some on, and then sprinkled on some fiber reactive dyes from Dharma Trading. And I let everything sit for 24 hours, as Jessica warned, 24 hours after the ice melts. Jessica also said to Trust the Muck. Meaning it is OK if the ice melts and all the dye pools around the cloth. Trust the Muck.

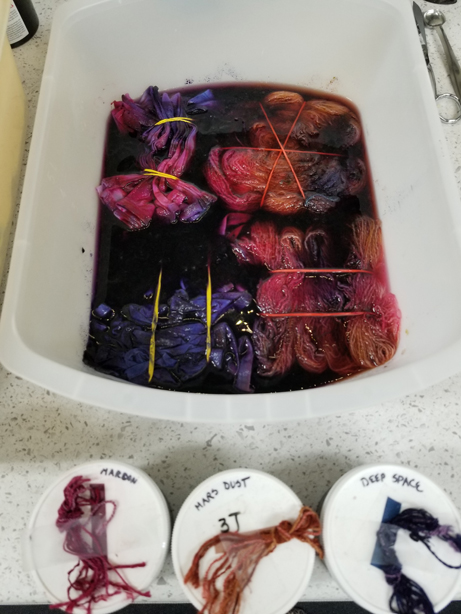
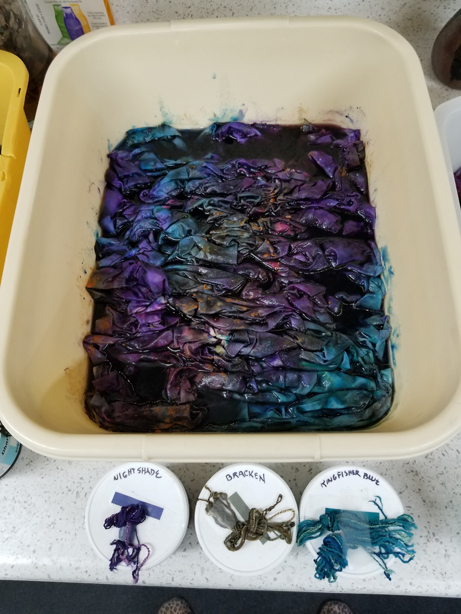
Well, everything was ready to rinse about 1am going into Friday morning. And yes, I couldn’t wait, so I stayed up and rinsed and rinsed and rinsed and then couldn’t sleep all night because I was so freaking excited by what came out.

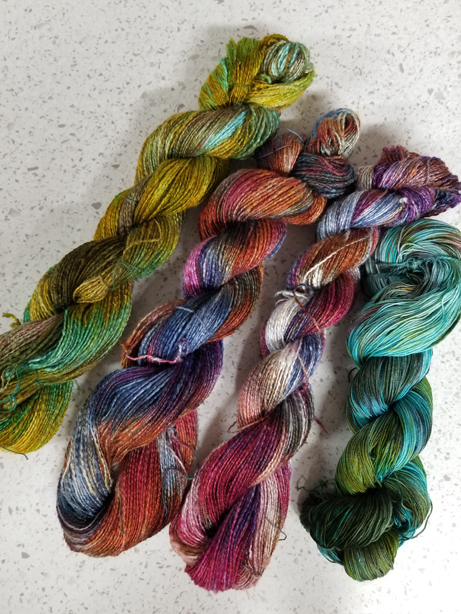
Here are a few skeins of yarn…

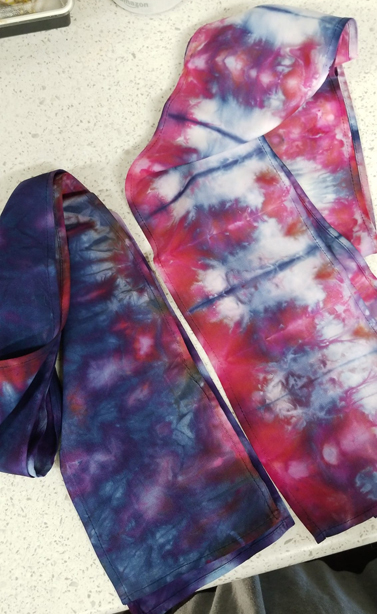
Here are a couple rayon challis scarves…

Here is my new favorite thing in the whole world, my vintage table napkin that I now use with every meal.

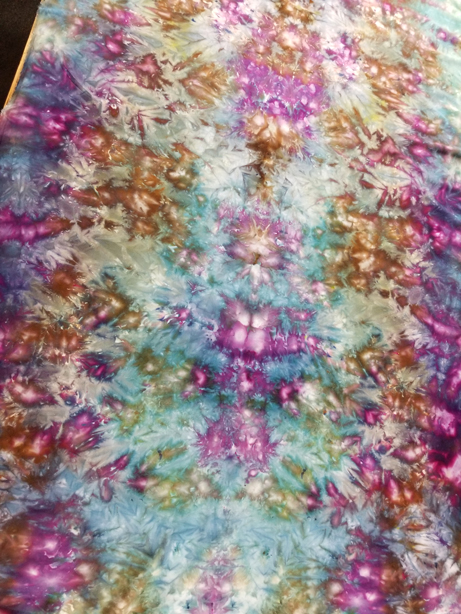
And here is the most gorgeous rayon challis fabric, I’m just gobsmacked looking at this across my cutting table, I can’t wait to figure out how to use this, almost too gorgeous to hide inside a garment as a lining, (which was the whole point in trying this technique, ways to get interesting linings…)

And while I listened to lecture after lecture over the last couple weeks, I came across this drop spindle I had tucked in a bag, with an alpaca silk blend fiber that I had started to spin eons ago. The fiber was from Gale Evans at www.galesart.com and I was sad to read that Gale closed the shop in May of this year, to move on to another medium, giving up fibers and dyeing all together. I know how Gale feels…

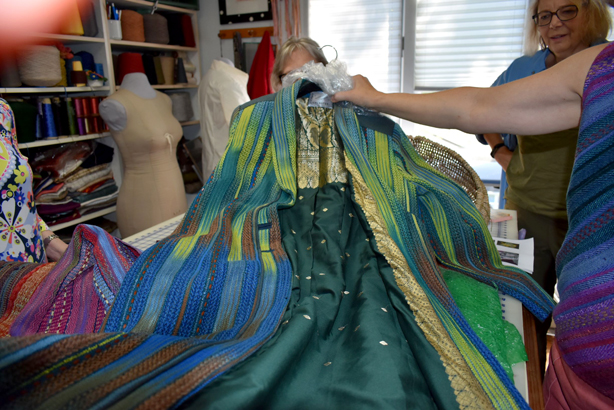
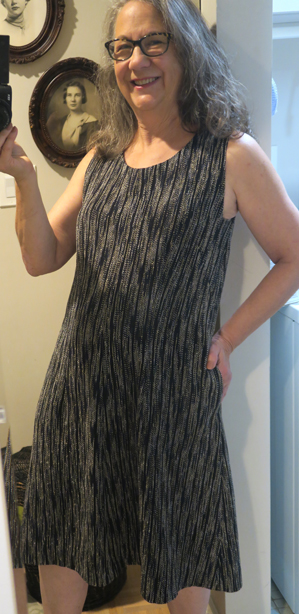
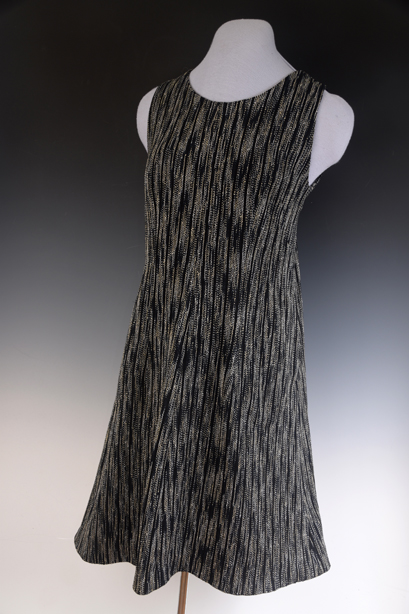
And I actually finished a garment in the studio. I’ve been slowly working on handwoven garments, bits at a time while I write script and demo the techniques for my YouTube videos. We just finished shooting the last techniques for this dress, installing an invisible zipper which just dropped Friday, and one for next week on installing a neck/armhole facing. So the dress, which is made from the handwoven Antique Jewels Fabric I wove last year, the draft is a free download available here, is finished and I can’t wait to wear this. The fabric was perfect, it held its shape and was a joy to sew. The pattern is my 1000 swing dress. That’s available as a download (not free) here. It has pockets!

And so dear readers, my life is starting to fill up again, and I’m not sure how I feel about that, but the opportunities are just too much fun, and there are too many fun things to do out there. I managed to get into NYC for the day last week, to the MET, and the Jewish Museum, and to meet up with a dear friend and have sushi down near 28th street. Except for when I was actively eating I wore a mask the entire day, and had no problem doing so, even though I’ve been vaccinated for months. Scary times, covid cases are on the rise, and I’ll continue to wear a mask wherever I go.

Stay safe out there, and learn all the things!

Entertaining at home…

I spent a glorious weekend with my sisters “down the shore”, and if you are friends with me on facebook you will have seen all of those very cool photos of us having a Jersey shore experience.  This morning when I woke up I had a bunch of pictures in my inbox from Ann Marie Soto, extraordinary member of ASG, or the American Sewing Guild, editor of the former Notions Magazine, and luckily for us in the area, member of the North Jersey Chapter of the guild.  

A week ago Saturday, one of the ASG neighborhood groups, the Sewphisticates, who are primarily focused on clothing, chose a studio visit and trunk show with me for their September meeting.  A half dozen members crowded into my studio to have a look at what I do and where I work, and a peak into my “closet” of handwoven clothing.  We stood around the table, and I got rare photos of me actually talking and explaining and telling stories, and this morning Ann Marie sent them along.  They are colorful and fun and though I took not a single image the whole day, she captured some lovely ones.


We started in the studio, gathered around the couple of looms with stuff actually on them.  Few had any real weaving experience, so understanding how cloth was woven is an important piece of information if you sew.

We looked at yarn, the beginning of ideas for how my designs are planned.  These are all hand dyed wools and mohairs.  I’m itching to figure out something that will celebrate these colors.

I showed them some yardage, and of course, Chaos, draft available here, designed from some random skeins I had used as dye mops (soaking up leftover dye from another job) and included a warp chain made from a similar dyed “dye mop” skein ready for the next yardage on the loom.

I showed the Autumn Patchwork duster, along with Chaos, which had just returned from an exhibit in Tennessee.  The colors are pretty impressive when I look at them in this kind of photo.  When I’m working on something, I get too close to it, and don’t realize the bigger picture.

We all headed to my office, where I had another loom, with yardage using Noro Taiyo Lace as the weft, and I unrolled it for them to see the beautiful color gradations.  

Then we headed down to the dining room, where I had set up a half dozen Structo’s and gave them the basics of how thread interlacement works, plain weave vs. twill, and they were soon weaving away.  

We had lunch on the decks and by the pond, and then I showed a number of my garments so they could see construction and finishing techniques.  We had a wonderful time.  I was so thrilled for the opportunity to show off what I do all day, to have an excuse to actually get out of my pajamas and entertain.  The animals were adorable if a bit obnoxious, Ranger just didn’t know what to do with himself with all these ladies around!  Very large frozen marrow bones helped keep them outside for a good chunk of time…

Anyway, I’m appreciative of the lovely photos Ann Marie sent, and that I was actually around to be able to host a neighborhood group of the ASG.  They do some lovely field trips, and I was glad I could be one of them!

Heading to the Pacific Northwest at the end of the week!  

Stay tuned…

An apology and a tutorial.

Dear Janome Memory Craft 6600,

I see you sitting there watching me from wherever I am in the studio.  I know you have that blank, sad, unused, unloved puppy face, looking forlorn because I haven’t spent any time with you in awhile, at least not any regular quality time.  OK, yesterday’s repairs of the boy’s jeans and sweats didn’t count, you are so much more than just a sewing machine to be lugged out when a zipper breaks or a seam rips.  I know I’m neglecting you and all you are capable of, and in fact I miss you too.  I can assure you that you are my most favorite sewing machine I’ve ever owned, and I long to work on another project with you soon.

New Year’s resolutions are coming and I’m promising that I’m making an early one to always have a sewing project to work on, and I really really promise I won’t languish over the project for eight months like the last one.  Take heart, there are six looms calling at me, but only one sewing machine, and that sad blank look you give me as I walk by is calling to me louder than the looms right now.  Yes, I’m on deadline for an article, 8 yards of fabric needs to be woven off, and a project/kit has to be designed, and an article written with step by step photos, but I can pay attention to you too.  It is good for both of our souls.

So my humble apologies for neglecting you, and I’m going to try to make things right by starting in on another project.  But understand, before I can turn you on, I have to do the prep work.  I know, you’ll patiently wait because if I don’t do the prep work, I’ll never really like the way the garment fits or the way the fabric cleans.  But I worked hard all week long on the prep work and now I’m hoping  to cut out the tunic this weekend, so soon I’ll turn you on and have your competent motor purring along like a contented cat.

With much love,

Daryl

PS, Really really I’m through the prep work, just read the tutorial below…

First, the project.  I picked up three yards of a gorgeous cotton shirting fabric, a plaid of sorts with grey, white and aqua tones, when I was out in Boulder Colorado at Elfriede’s Fine Fabrics.  And I pulled from my pattern stash, a very cool Issey Miyake Vogue Pattern.  I love Issey Miyake patterns, they are like 500 piece puzzles, everything ends up fitting together in such an origami-esque kind of way, but the construction is always challenging and fun.  This particular pattern called for some really interesting pleating in diagonal ways across the garment, and it says right on the pattern envelope that it is unsuitable for plaids.  But that never stopped me.  I’m thinking this could be really really cool, or really really stupid.  You just don’t know until you try.  Sort of “Plaid Interrupted…”

This is V1204, and it is or was (I don’t know the current status) available in two size ranges.  This is always a dilemma, since I am right in the middle of the 12-14 pattern range, and the AA size goes to a 12 and the EE size starts at 14.

In the end, I chose the EE size, even though the pattern ease was described as “Very Loose-fitting”, meaning there is an extra 8 inches of ease in a shirt over the actual bust measurement.  I’m not sure why, probably because when I was ordering a bunch of patterns, I forgot to check the ease allowances.  I like my clothing to fit well, and to follow my shape.  I lived through the 80’s and 90’s when clothing was generic, boxy and one size fitted all.  That isn’t me and that isn’t my personal aesthetic. And I don’t like very loose fitting styles. The photo on the front of the pattern envelope is really deceiving because that’s the way I want the garment/tunic to look, and there is no way that tunic is eight inches larger than the model.  Then again, just making a size smaller could mean the shoulders are too tight.

So first things first.  Before I tackle the pattern decisions and adjustments, I need to get the fabric in to soak.  First I check that the fabric is on grain.  Meaning that the cut ends are thread perpendicular to the lengthwise grain, that a weft thread can be pulled straight across.  This fabric was easy because it was a woven plaid.  It was already cut on grain by the fabric store.  I pre-shrink all my fabrics, and I am always met with such incredulous stares when I mention this to students in my sewing classes, “You mean you can’t just buy it at the fabric store and start cutting it out?”  NO!  Except for wools, which I handle differently, I put almost all fabrics into a basin of very hot water, soak for 20 minutes and either roll in a towel to dry or spin off in the machine, depending on the fabric.  The spin cycle can leave nasty wrinkles in the fabric.  I chose to spin this cotton fabric, because there were three yards and I knew I could do a decent job pressing it later on.

Once hanging to dry I tackle the pattern decisions.  By opening up the pattern pieces, I can find the little finished circumference indicators at the bust and hip and check them against my own measurements.

Before I do anything else, I take the pattern pieces out of the pattern envelope and I press the pieces with a dry iron.  That removes any wrinkles and I’ll be more accurate when I trace off the pattern pieces I want.  That’s right.  I NEVER use the actual tissue as it comes out of the pattern envelope.  I want to preserve the pattern in all of it’s sizes, kind of like playing around with a photo in Photoshop, I alway leave the original untouched and play around with a copy.

I always buy by my chest measurement, because you get a more accurate fit, and unfortunately the chest measurement is rarely included on the pattern.  The bust circumference is not the way to measure, since all patterns are graded on a B cup, that is 1 1/4″ – 2″ difference between the chest and bust circumference, which I can assure you isn’t very much in the asset category at all.

Sidebar: after loosing a breast to cancer, I went for my prosthesis fitting and the fitter asked what size I wanted to be.  I answered between 1 1/4″ and 2″ difference between the chest and bust circumference measurement.  She thought I was completely crazy.  My logic was I’d never have to adjust a cup/bust measurement in a commercial pattern ever again…  🙂  (I don’t recommend this method of body alteration, it really is easier to just alter the pattern, but hey, I didn’t chose to get breast cancer!)

A Size 14 in commercial patterns calls for a 36″ bust circumference.  If you subtract 2″, you’ll get the chest measurement.  My chest (measured above the breast tissue tight under the arms) measures 34″, so a 14 should fit really well.  Except that according to the little finished circumference guide printed on the pattern, which is described as “Very Loose Fitting” this tunic will be 43 1/2″ around.  That calculates to 7 1/2″ of extra ease.  And the front of this tunic has a huge overlap.  I know I’m not going to be happy with the finished garment if I make the size 14.  So I opted to trace the size 12 instead except, crap, I bought the 14-20 multi size pattern.  No problem.  This is where having the grading schematic comes in handy.  If you look at the way a pattern is graded from size to size, there is a very clear proportionate schematic, and by following that schematic, you can trace a smaller or larger size by just increasing or decreasing by each of the increments drawn on the pattern.

But I’m getting ahead of myself…  I actually trace the tissue pattern using a product called Red Dot Tracer.  It is made by HTC, and now I understand also available from Pellon, after many try and fail attempts getting the base material right.  I haven’t tried the new Pellon version, but I will if HTC stops shipping for any reason (They do that frequently).  It is available on my website, if you can’t find it in stores).  I love this product, because I can trace what I want, use the red dots to make sure the pattern is perfectly on grain, and then sew it together as a first muslin.  I can then decide if it is even worth going forward to the muslin stage.  I match up the grainline of the pattern, with a row of red dots, and anchor it to a cardboard cutting board with push pins, lining up the grainline and row of dots with a gridline on the cutting board.  OK, I’m really anal about this.  But I do accurate work and each of these little details helps make the end product that much more precise and polished.

Now I carefully trace the patterns and the details I want, and in this case, I grade the pattern down from a 14 to a 12.  Once I have all the pieces traced, I go to my trusty Janome and turn it on (see, I told you I’d be using you shortly…) and stitch together the main pattern pieces using a long machine basting stitch (the longest stitch your machine will do).  I have a dress form and so my first stop is to try it on the form.  This isn’t a really really fitted style, there are no darts, and even though the waist is too short for me, there doesn’t seem to be any reason to lengthen the torso since the garment fits straight down from under the arm, and the closure sits well above the waist.

The fit looked really good on my dress form.  So I went into the bathroom and tried on the tunic pattern, and I think the fit is good.  I didn’t get a photo because no one else was up yet to take a picture of me and I didn’t feel like combing my hair, and a lot of my fit assessment is based on how the pattern feels on anyway.

So the next step here would normally to go to a cheap fabric and make up a muslin in the basic pattern pieces.  I know, I’m going to get letters, but I decided to skip this step.  I’m reasonably confident I’m going to like the fit, call it experience, and though I might regret the decision not to make it up first in something else, I’m happy enough with how the pattern feels on, so I’m going to take a chance.  But you didn’t hear that from me…  I’ll let you know if I should have done a muslin first.  Stay tuned…

A surprising afternoon…

Yesterday morning I woke to beautiful spring like sunshine, the gardens exploding in color, and the promise of a day in the yard, weeding, mulching, staking peas, and generally enjoying my private oasis.  I did a quick check of my email, and my Google Calendar Alert popped up reminding me that within an hour, I needed to be in Dover at the Hilton Garden Inn for the American Sewing Guild Spring Fling.  This is an annual event sponsored by the North Jersey Chapter of the ASG.  Insert audible groan…  There goes my day in the gardens.  However I have no one to blame but myself, I signed up for this event, only Wednesday, because I to need to get out of my studio, get some inspiration and support my local sewing chapter.  I went off to the shower…

What a great day this turned out to be.  The speaker was Anna Mazur, you would know her if you’ve subscribed to Threads Magazine in the last few years.  What a gifted and talented sewer, dressmaker, designer, fabric artist, and inspiration.  Anna is a Contributing Editor for Threads, and many many of her intricate garments and techniques have been featured over the years.  She began her program with her experience with beads, how she works, organizes, and lays-out her projects.  I intentionally listened with only half an ear since I did NOT want to run the risk of getting into yet another area of study.  After all, I just bought this new loom…

The lunch was surprisingly good, and then came the best part.  Anna brought a car full of her most amazing garments, spanning 30 years of dedicated workmanship, including some amazing coats tailored for her daughter when she was just a toddler (she is now graduating from college).  She brought garments from her articles, and garments from the Bernina Fashion Shows.  She brought award winning garments, and some of her mistakes.  It was a pleasure to listen and to be inspired, she has a sense of humor and an easy spirited demeanor that is engaging and encouraging.  And it was great to spend time with someone who is way more skilled than I am…   🙂

I actually learned a thing or two…   🙂

After the luncheon, I stayed to help Anna, introduced to her by our chapter president Carla, I am an experienced garment packer from years of schlepping and hauling my garments all over the world.  While we were packing, one of the attendees Sara Ann Megletti, owner of PB&J Stores in Newton, NJ covered one of the round banquet tables with the most beautiful Polymer Clay buttons I’ve ever seen.  Not only were their surfaces rich, but the color palettes fresh and current, and the shapes interesting and playful. I of course bought the olive green button in the center of the group photo, out of all of them, it kept calling to me…

Sara said that the buttons, from Crone Art, will be sold through distributors like herself, and she is feverishly working to get the collection up on her webstore.  She anticipates availability within the week.

So Anna will be teaching at the American Sewing Guild Atlanta Conference in August, where I will be as well, and we hugged and promised to reconnect in August.  It will be my pleasure…

On a sad note, my poor techie Kevin, stayed up until 3am last night, doing what a techie does when all else fails.  Uninstall/Reinstall.  I have had, as you have probably experienced, continual Fatal Error messages when trying to read, post or post comments on my blog, referring to Out of Memory Errors, since December 19th, 2009 when the first error was recorded in the log.  When I say this techie of mine is good, I think he is the best, his tenacity to stick with a problem until it is solved puts me to shame, and he has worked tirelessly on this problem for months.  The problem seems to be getting progressively worse, and the only thing left to try was a complete uninstall and reinstall.  Scary, but I trusted he would be able to do it without losing my data.

At 3am, he came to bed confident that the problem was corrected.  Sadly, three sentences into writing this post, I got the fatal error message.  I wanted to cry…

So, we will keep trying, be patient….

Just chugging along, singing a song…

I am making progress, or else I’m completely delusional…  It is hard to stay focused, but maybe that’s not a bad thing.  Having severe ADD can come in handy when you are trying to take care of 20 tasks at once.  They eventually all get completed, and sometimes all at the same time, and that’s cause for celebration.

mugmatsmugmat_backingreworked_mugmatI took a little detour, because I had these little things sitting on my sewing machine, and they were just calling to me saying, “Fix me, fix me…”  So of course, I got knocked off course temporarily.  I blogged about my guild mug mat exchange last December (you have to scroll way down to find that part of the blog to see my mug mats).  I never showed the mats that I got.  Let me say that I love the fabric, and the colors, and the pattern of the mug mats I received at the exchange.  And I love the gorgeous wool backing my guild mate used to make the mats.  What I didn’t like, I’ll be honest, was the way they were constructed.  It was a sewing thing.  And I’m a sewer.  And I own a pair of shears and I’m not afraid to take something apart when I don’t like how it is constructed…  🙂

So I spent about an hour, I had already taken the six mats apart, and trimmed them and fringed them, and added a piece of interfacing to the back.  I re-pinned the wool, and did a fine zig zag around the perimeter of each mat.  Now they lay flat, and don’t have the lumpy uneven corners that could cause a wine glass to tip…  🙂

I’ve been working steadily on updating all the of the presentations/lectures/workshops I’m going to be giving on my southwest tour in February.  Since I’ve started the blog, I’ve spent hours documenting all of my projects, step by step photos, working out new techniques, and generally having a good time of it all, but I realized looking back over some of my lectures/workshops/monographs, that they could use a bit of updating, with some of the newer techniques/photos/projects.  The Leftovers Monograph needed a major overhaul, with all the new totes I did earlier on in the year.  I have much better step by step photos now, many of the ones I originally used were scanned from slides from storyboard techniques I used for demo purposes.  I finished reworking all the lecture/workshops for the trip, just proofing them now, but while I was working on updating the step by step PowerPoint slides, I had one of those slap yourself upside the head and yell, “Duh…” moments.  I had made a couple of placemats from leftover scraps, and developed a half day workshop out of it, I’ll be giving it this summer at the American Sewing Guild Conference in Atlanta in August, but I never resolved the edge binding.  I tried binding them a couple of different ways, and both attempts were too time consuming and clumsy for a four hour class.  Speed and ease in a class like this is so critical.  Just because I can do it, doesn’t mean a class of 25 students, sharing machines, in four hours, of mixed skill levels can do it.

cut_lining_apply_bindingstitch_bindingWell, suddenly it hit me.  So simple.  No need for a separate bias binding here.  Just cut the lining for the mat bigger, and fold around the front and stitch.  It worked.  So easy.  I undid all the binding on both of the mats, and tried out this method, I was so excited, and loved the finish.  I gave the mats a final pressing and…

This would not be a good time to mention that I failed to follow the most basic of all sewing rules.  That would be preshrinking the fabric.  I of course would never take such a short cut as to not preshrink the lining used as the backing for my lovely mats.  So I don’t need to mention here what happens when you iron something that hasn’t been pre-shrunk.  Lets just say I wanted to kill another couple of hours and remove all the stitching again so I could prove how important it is to pre-shrink fabrics before you make stuff.  🙂

rayon_boucleIn the middle of that escapade, I got one of Webs emails, you know the one with all the cool knitting yarns on sale.  Since I don’t as a rule buy knitting yarns, I’m not so inclined to check it out, but I lie…  If you search, there is always something in the weaving yarn mill end clearance that just has to come live with me, and I always groan audibly whenever the Webs sale ad comes into my inbox.  I can’t not check…  And of course Webs is too quick to ship…  yarnSo I got a little additional diversion, a back order I forgot I had from Halcyon, and my cheap yarn from Webs both arrived the same day, I unpacked everything and was sort of surprised at this huge cone of rayon bouclé in a lovely soft variegated color.  I thought I had ordered something else, but this is pretty cool, and I think the whole two pound plus cone was something like $15.  Works for me…

And finally, I finished a piece I’ve had on the loom since last fall.  This is one of my Personal Post Series artworks, small woven images in a Theo Moorman inlay technique, I’ve blogged about this technique numerous times, just do a search for “Big Sister” and there are all kinds of how to’s out there in my archives.  I was doing a pair of images, that I wanted to somehow use to create a diptych, images that play off of each other, bound in a way to make them book like, which I have done, but I don’t want to show the final images just yet.  I am hoping to enter this piece in the Small Expressions exhibit for HGA, but there is a query going around the blog-o-sphere about the definition of “published work”.

HGA (that would be the Handweavers Guild of America), who sponsors Convergence which will be in Albuquerque this July, is sponsoring four exhibits, one of which is the yardage exhibit I just applied to with work from my last blog.  The requirements are that the work cannot have been published.  Two years ago when I asked for more specific information about this subject, I was told that website content didn’t count, that they were mostly concerned with magazine publishing, or books/catalogs with the work, that would have a national RestInPeaceexposure before being exhibited at a Convergence.  I understand that policy, and respect it.  The piece I had done for the fashion show, earlier in the year, I stupidly let Threads publish, and now I can’t enter it in Convergence, because of this policy.  No matter, I have other work to enter.  But the question has come up, do blogs count as publishing?  I hadn’t given that much thought, because website content was safe and I think of my blog as an extension of my website.  But blogs are a form of publishing.  So I have a query out to HGA, and hopefully will get a response in a timely fashion because the next three deadlines are lurking around the corner…  Meanwhile, here is the piece just before I cut it off the loom.

Eventually I’ll show the finished piece and the story behind it.  I think it is a pretty powerful piece, because it is about something important to me.  And that is what art is.  A form of communication.  Whether it gets accepted to the exhibition is a whole separate issue, and that will be what it is.  But for now, I am proud of this piece, and will eventually show it to you when I find out if blogging is actually publishing.