A Cast of Characters

I could not get focused today.  Maybe it was because I got up at 3am to drive my husband and son to the airport.  They are taking advantage of some frequent flyer miles, my son’s spring break, and some new snow in Utah, and off they flew to Salt Lake City for the week to enjoy some guy time on the mountain.  🙂

I did go back to bed once I returned from the airport, and I did manage another four hours of sleep, but the day felt very disjointed.  So I puttered.  I did a little of this, a little of that.  After all, it is Sunday, and most normal people get off a day or two a week.  That would be a foreign word for me.  I did some grocery shopping, cleaned my bathroom, started cleaning the kitchen, the dirt doesn’t stop coming just because I left for a week for a conference.  I tackled a pile of files, deciding that my son’s progress reports and school files from elementary and middle school, now that he is in college, didn’t need to be taking up space in my file cabinet any longer.  They’ve been on my floor for awhile.  So that pile is gone.

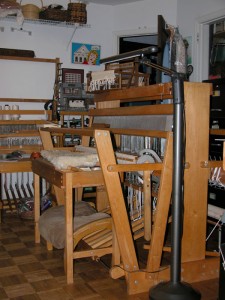
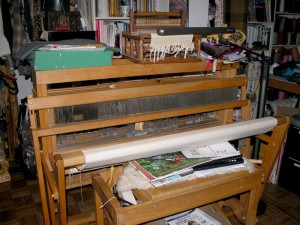
Speaking of piles.  loom1

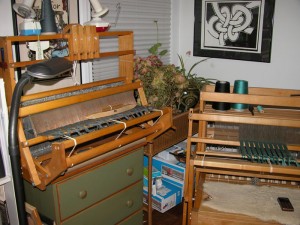
This is what happens when a loom is left unused for a period of time.  Piles start to cover it.  It looks lost amid the debris.  I had a major guilt attack today over my poor naked looms.  I’m in the middle of too many other projects to even think about getting a warp on this puppy, my beloved first loom, a 45″ 8 shaft double sectional back beam Tools of the Trade, I bought in 1978, right out of college.  I love this loom, I will never part with it.  I have woven thousands of yards of fabric on it.  But at the moment, it is looking like a neglected child.

Enter the twins.

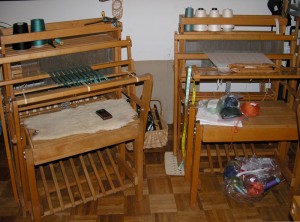
twinsThis pair of looms sits beside the big loom.  I never named my looms, not sure why. It was hard enough to name my kids.  So this pair, both from Tools of the Trade as well, bought in the 1980’s at different times, helps me out when my big loom is busy.  The one on the right, 25″ wide, is four shaft, and it is warped with 10/2 cotton for my daughter’s and my placemat exchange we are doing with the Jockey Hollow Guild.  More about that later.

The one on the left, is pretty well equipped, for a 25″ wide loom, it has eight shafts, double sectional back beams, and is a little work horse.  I wove the Arctic Sky fabric on that loom.  It currently has the remaining yard or so of tencel warp from a Bonnie Inouye class I took last October (oh how embarrassing).  It had my only 25″ 12 dent reed in it, which I needed for the placemat exchange loom on the right, so I stole it.  Just pulled the warp out of the reed and moved it over.  So I couldn’t have woven the rest of the warp if I had wanted to.

loom2To the left of that loom, I have a 25″ Tools of the Trade table loom, also four shaft, that I keep warped with a Theo Moorman 10/2 cotton structure, for my art pieces.  I just finished the Big Sister piece, and I had originally needed the 12 dent reed for that one, but settled on a 6 dent reed, though I wasn’t completely happy with the reed marks it left.

So I was pretty embarrassed that nothing was happening on any of my four looms, one without a reed, one with the wrong reed, one with a warp and nothing started, and one with no warp at all.

So I looked through my vast stash of reeds, and found an extra 12 dent reed I had purchased used many years ago, for my 45″ loom, and I had my daughter hacksaw the thing into two pieces.  I decided that I needed to spend the day paying some attention to my poor neglected looms, and I resleyed the tencel warp into the replacement reed, and I switched out the reed on the table loom, tied both warps on the front beams, and they are ready to weave.

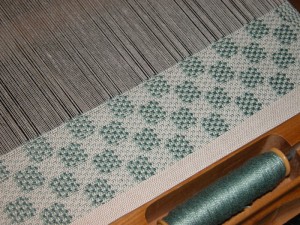
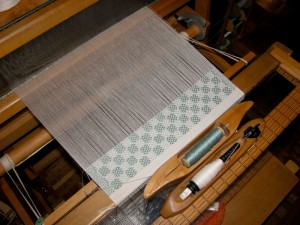
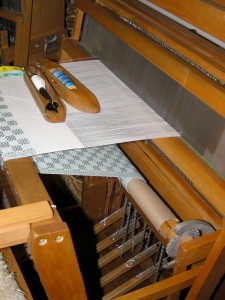
dog_tracksI turned my attention to the placemat exchange, and spent some time getting the structure to work right.  I took it from a workshop I took many years ago with Barbara Miller on 18th Century Structures.  It is a four shaft overshot pattern called Dog Tracks.  My daughter and I are both participating in this exchange, each of the 16 participants picks a 5/2 cotton weft color, and winds off a couple ounces and passes a ball off to each of the other 7 participants in their group.  My daughter and I are in two different groups.  So we will each have eight different overshot placemats at the end, all in our selected color.  I chose a grayed green, and I started the whole thing with mine.  Once I reworked the treadling, to give me the placement of the blocks I wanted, it started to weave quite well.  warp

I detest two shuttle weaves.  I know, I know…  But I am use to weaving yardage, lots of yardage, I like my shuttles to fly, and two shuttle weaves just don’t produce the speed of a one shuttle structure.  Part of the problem here is the size of the loom.  There isn’t room for the two shuttles to fit on the web, when I beat, they bounce right off the loom into my lap and onto the floor.  I solved this problem on another warp I did, by taking the unused second back beam from the eight shaft (remember two warp beams require a second back beam), and clipping it onto the front of the loom, with a heavy plastic ruler clipped to the surface so I have an extra ledge to support the shuttles while I’m weaving.

I did manage to get to Morristown today, to practice with my recorder group.  I probably didn’t mention that I play Baroque recorder, I play alto with this group, and we got all new music today, something new to practice, a whole play list of French love songs from the 1600’s.    And I did manage to get down to my neighbor’s house for our Sunday night ritual, a gathering of the women to watch Desperate Housewives.  We hoot and howl all the way through it, and will be really sorry when the season ends, it is a long way until September….

It turned out to be a productive day after all, and the looms (all except my big one) look so much more happy.  I think tomorrow I will clean off the big loom so it doesn’t feel so burdened with my junk…

A Great Diversion

I packed up a long list of supplies to bring to the American Sewing Guild neighborhood chapter meeting this morning.  My local chapter is called the Clifton Clippers, which meets in, obviously, Clifton, NJ.  It is a growing group, the few meetings I have attended, there are always a handful of new people.

Unlike my weaving guilds, the sewing guild programs tend to be more hands on, bring a machine and make a project.  That’s really tough to do in the parameters of an average weaving guild meeting.  So I’m not use to packing up supplies right before a meeting, and I enjoyed poking through my studio looking for stuff on the list.
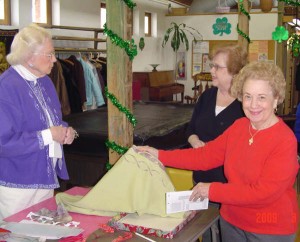
renie-helen-dorothyToday’s program featured ASG member Renie, a talented sewer quilter, who lead the group step by step in turning a sweatshirt into a decorative cardigan. That’s Renie in purple on the left.  I didn’t shop ahead of time, and purchase a new sweatshirt for the occasion, I just rooted through my closet and picked the two that didn’t have anything written on the front.  Works for me.

We were suppose to bring a half yard of coordinating fabric.  In this group, it is assumed that your fabric will be a cotton quilt fabric, but I’m not a quilter, and my stash consists of a lot of odd things, and lots of handwoven scraps.  I had a half yard piece of handwoven fabric, left from my production days, (that would be the 1980’s), poorly sett, plain weave, with lots of mixed warp yarns in various textures and colors, and a variegated rayon weft.  I really wasn’t sure what we were going to be doing with it, but I packed up my machine and stuff on the list, and hit the road.

The meeting was fun.  I love the companionship of others who think like me, are creative, I love show and tell, in any of my groups.  One woman turned a daughter’s wedding gown into a Christening gown for her daughter’s baby.  It was beautiful.  What a great idea.  And of course I showed off the dress I wore in the fashion show in California.

So the program started, and Renie carefully laid everything out step by step, she had a sweatshirt/cardigan on that was lovely, and had another one in various stages of development.  She explained the process and then turned us loose.  This guild is beginning to get use to me, only having handwoven fabric to play with.
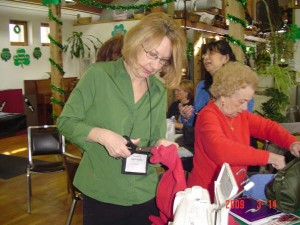
DarylCuttingDarylSewingWell, I had a blast.  Once I got the sweatshirt cut apart, and the bottom trim on, I packed up my things, to continue at home so I could use my own powerful iron, and I could concentrate.  And take pictures….  🙂

So, the first step was to remove the wrist bands and waist band.  Then after carefully measuring, I cut up the center front, instantly transforming the sweatshirt into a cardigan.  Renie showed a sweatshirt turned inside out, and I loved the feel of the inside of my favorite red sweatshirt, which I was cutting apart for this adventure, so I turned mine inside out as well.  So the outside now feels like soft cotton fleece.
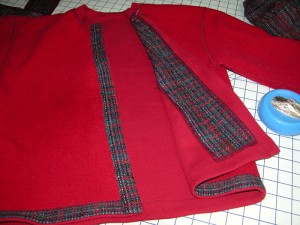
sweatshirt1Then I took my handwoven and cut 1 1/4″ strips off the selvedge, these I sewed to the bottom and fronts of the wrong side of the  jacket, and brought them around to the front, top stitching the selvedge into place.  Renie used quilt fabrics, which don’t have the same kind of selvedges as handwoven fabrics, so she left extra to turn under on her strips.sweatshirt2
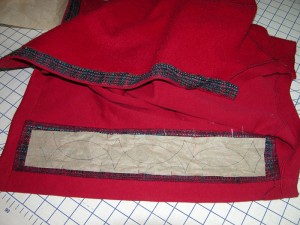
We were told to bring stencils if we had them, shows how much I know, I brought my fabric painting stencils, with fabric paint.  Duh… what they really meant was quilting stencils.  So I borrowed a pretty one from Renie, and traced the pattern onto the back of my materials list.  I brought it home, and expanded it to fill the space on either side of the center front.  I then finished off the edges of a wider strip of handwoven, and pinned it down on the back of one of the garment fronts, and then traced the quilting stencil pattern onto tissue paper.  The old fashion kind that tears away easily.  Renie could just draw the stencil onto the back of a quilt fabric, but that doesn’t work for a slubby multi-colored handwoven.  I placed the tissue drawing down on the top of the handwoven strip, which was cut just a bit wider than the stencil design, and pinned everything into place.
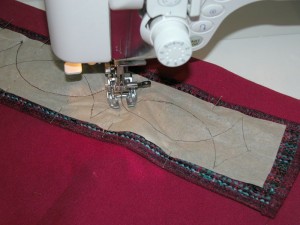
sweatshirt3I went to my trusty Janome 6600, God I love this machine, and carefully followed the stitching outline I drew on the tracing paper with a medium size stitch length.sweatshirt4
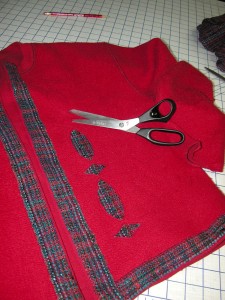
Once I finished the stitching, I tore away the tissue paper, and then from the right side of the jacket, I clipped away the sweatshirt fabric to reveal the handwoven underneath.  Obviously you have to be careful here, and it helps to have sharp scissors with really blunt tips.
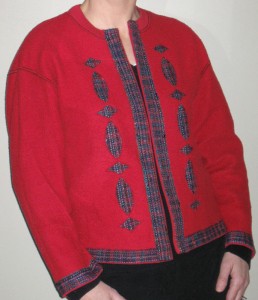
sweatshirt5I worked on the second front, I was a woman possessed.  Forget any thoughts of cleaning, or cutting out my poor arctic sky jacket lining.  I wanted to finish this jacket.  It is my new favorite thing to slouch around in.  I’m calling it my studio sweater, for when I need something comfy to put around my shoulders while I’m working, my well worn sweatshirt is now a stylish jacket trimmed with handwoven.  I finished edging the sleeves, and Voilá!

I realized that this is an excellent thing to do with a surplus handwoven scarf.  The selvedges can be used for the edge trim, and the interior of the scarf can be the strip that peeks out of the cut away stencil design on the front.  I have a few extra scarves sitting around, and I’m thinking there are other sweatshirts that could use a transformation…

Of course I worked right through dinner, and that meant we had to go out, so I got to wear my new jacket to the pizza place.

So now I’m going to totally blow off the rest of the evening, and watch the episode I missed last weekend while I was away, of Desperate Housewives, on my computer.  Oh, and BTW, when I was exiting the subway Thursday night in NYC, I saw a poster on the wall advertising a new HBO series, starting on March 29, at 8pm, Alexander McCall Smith’s #1 Ladies Detective Agency Series.  So those of you who don’t watch television often like me (Desperate Housewives is the only thing I watch other than Project Runway when it is airing), and don’t get advertising for this kind of stuff, you might want to tune in, the books are terrific!

Odds and Ends

The last couple of days have been whirlwind of catching up, meeting some deadlines I put off until after my California trip, contracts, cleaning, trying to find my house again, piles of laundry, and some terrific social events.

I got an email today from Lisa Skura, my class angel in the three day jacket workshop in California, letting me know that one of the conference attendees posted all of her photos, many from the fashion show, on a Picasa website, her name is Helene Korn, and the pictures are fun.  Check it out.

I received an email notification a couple days ago, that I was finally accepted to teach at the CNCH (Conference of Northern California Handweavers), April 8-11, 2010, in Santa Clara.  This is a particularly important conference to me, and getting this acceptance means a lot.

Sidebar:  When I was diagnosed with cancer seven years ago, one of the hardest things for me to face, and I know this is going to sound really odd, was writing the letters canceling four teaching commitments, three of them conferences, and it was that act, not losing a breast, not the trauma to my family, not the six months of chemo, but the canceling of commitments that nearly undid me.  When you face a life altering thing like cancer, the stress manifests itself in the oddest places.  I honestly didn’t care about the breast.  I was happy to lose it if it would save my life.  I wasn’t happy that I couldn’t finish what I had started, the conferences that I had committed to, and my work meant everything to me.

One of the conferences I had to cancel was the CNCH conference for 2002.  I was eventually invited to participate in the Asilomar Retreat held on the off years of the CNCH, but not the conference itself.  I always felt like I had something to finish and was frustrated I couldn’t make up for not being able to follow through.

So, when I returned from California, earlier this week, I had an acceptance waiting for me, to teach at the CNCH conference, and I immediately felt a huge relief that I could finally finish what I had started seven years ago.  I will eventually update my website calendar when the dust settles a bit more around here, so stay tuned…

Yesterday evening, I hopped on a bus, and headed into NYC to hear a lecture, sponsored by the Textile Study Group of NY.  The lecture was on Photographing your Work.  Yes, I know I teach this subject, I just gave the workshop to a wonderful group of people in Southern California, but when I offered my services to the Textile Study Group, I was told that they were looking for a real professional photographer.

So, I paid my $25. and hopped on a bus, and went to hear D. James Dee, a very well respected art photographer in NYC, teach a seminar on Photographing your Work.  I am glad I went, first, it was so interesting to be in a HUGE space, where lights can be placed anywhere, and backdrops can cover whole walls and tables.  Also, there are things I know, things I have been taught, but I actually didn’t understand completely why they were so. I actually got some clarification on a couple things I knew instinctively, but not why.  I also understood quickly the advantages of having someone who is an experienced teacher, and knows how break things down in an organized fashion to a varied group of students of all different levels.  I followed everything he was saying, because I do this sort of thing, but I sensed that many in the class were lost.  Mr. Dee is a terrific photographer, but I am not sure how experienced he is at teaching.

Also, since he is a professional photographer, the class wasn’t so much on photographing your work as it was on what to do with the disk of images that comes from a professional photographer.  Which I can see can be a real issue for artists that aren’t so computer literate.  If nothing else, the class made me much more confident that what I teach in my class, is really useful information in an organized fashion, that can be put to immediate use by the most average picture taker.  And, I produce a monograph in full color, that is a reproduction of the PowerPoint presentation, so students don’t have to take any notes!

Today I worked the whole day working on my sister, the architect’s website, I’m making great progress on the project pages, having a blast in Photoshop CS4, taking mediocre photos of beautiful homes she has designed, and turning them into magazine shots.  In all fairness to my sister, taking shots of a 4,500 square foot sprawling home is pretty difficult to do with a point and shoot camera, without getting keystone distortion, but Photoshop is my friend, and I corrected some amazing shots.  It is also really neat to carefully work through my sister’s body of work, I know what she does, but since she lives and works in rural northern Maryland, I don’t get to see her work first hand.  She designed the addition on my home, but that was 20 years ago.  I will say I’m really impressed.

Tonight my husband, daughter and I went to the Papermill Playhouse for one of our subscription series shows, the current production is Master Class, which was worthy of the standing ovation it received.  Barbara Walsh played opera diva Maria Callas, who retired from her singing career and taught a series of renowned master classes at Julliard in 1971.  The dialogue spoke of the passion of the arts, how important they are in our lives, and about finding the soul in your work.  I would love to get a copy of the script, there are many quotable lines in the show, and it isn’t lost on me, the perfect timing of the show, especially in this very difficult time for all of the arts with the seriousness of the downturn in the economy, and how bleak the immediate future is for many of our renowned institutions.

I am promising myself, that before the weekend is over, I will finish cutting out the pieces for the Arctic Sky Jacket.  I am longing to start sewing before the weather gets warm and I can’t wear the jacket!

Tomorrow is the monthly meeting of the American Sewing Guild neighborhood chapter I wrote about in my blog last month.  I think I’ll take my dress from the fashion show for Show and Tell…

Jacket Workshop, Final Call

Workshop Jacket

I don’t often get a chance to give the jacket making workshop I just gave to the ASCH Conference in Southern California, in the north east.  Since I’ve taught this workshop in this area for many years, there are fewer opportunities to offer it.  I spoke with Steve McKenzie from the Arts Workshop at the Newark Museum yesterday, and he said there were still some openings in the workshop, it isn’t too late to sign up.

This is a terrific class for anyone, not just handweavers, to get into sewing clothing, I guide you through the process step by step, starting with a basic jacket which is drafted to fit your body.  At the Newark Museum, we are able to do the class over four days, instead of three, to ensure participants will finish.

So if you live anywhere within driving distance of the Newark Museum in northern NJ, this is a great opportunity to take this class, I don’t have another one on the calendar in this area in  the next couple years.  The goal here is to get you sewing again, or even just sewing, if you are new to this skill.  All the information is below.  The museum has a number of Bernina sewing machines, so no need to drag a machine to Newark.  Parking is safe, the museum is beautiful, the cafe delicious, and the studios are well equipped.  And there is plenty of public transportation from NYC.

If you have already taken this workshop with me, and are looking for “what next”, I encourage you to take the workshop again, and this time, bring your own pattern and work out a muslin for your next sewing adventure.

Sewing 101: Garment Construction – Making a Simple
Unlined Jacket
with Daryl Lancaster

This is the perfect class for anyone who feels “sewing challenged.” Participants make a well-fitted jacket using an instructor-provided pattern and store bought, handwoven, or felted fabric. Making the jacket is an easy way to learn the basics of sewing and garment construction.
Students who have taken the class before may bring their own pattern. Sewing machines provided.

All Levels
Four Days, Friday through Monday, March 20 – 23,
10 am to 5 pm
Members $290; Non-members $320; Materials $30

http://www.newarkmuseum.org/ArtsWorkshop.html

A “Small World” Story

I have a great story to share, one of those “Small World” stories, one where I have been waiting for a final chapter for many years, and now I can put some closure on it.

So here is the set-up.  One of my favorite seminar/lectures I give,  is one I do on finishing fabric, and selection of setts, for handwoven yardage, which is quite a bit different than the sett you would chose for a hand-woven scarf. (For the non weavers reading this, sett is how many threads you put together in one inch).  I love this lecture for two reasons, one, it involves a whole pile of touchy-feely samples, lots of before and after, as in a) straight from the loom, b) gently washed in the bathroom sink and air dried, and c) thrown in the washer and dryer along with the regular laundry.  The other reason I love this lecture, is the look on the participant’s faces when they see how the washer and/or dryer can be a fabulous part of the design team.  Most handweavers lack the courage to plunge their yardage, into the washing machine, and then throw it in the dryer, thinking it will produce a mess, or cardboard.  This is one place where sampling is a fantastic and absolutely essential idea.  Sharon Alderman, author of Mastering Weave Structures from Interweave Press,  wandered into my classroom during one of the breaks and happily added her support of “It isn’t finished until it has been washed”!

But that isn’t the actual story.  A number of years ago, I was giving the lecture at a conference, the name of which escapes me.  It may have been 2001, at a conference called Creative Strands, a small venue in the mid-atlantic region, which was held at Bucknell College in PA.  Anyway, I do know the conference where I gave this lecture was somewhere in the north east, I can picture the classroom, but not much else.

detailI gave this lecture, on finishing your handwoven fabric, and after the lecture, one of the participants handed me a lovely, drapey piece of yardage, which she said, after listening to my lecture, wasn’t finished properly, sett properly, or was even pretty.  I didn’t agree about the pretty part, I loved the combination of aqua, plum and brown, and the gorgeous collection of knitting yarns that were used for the weaving.  It was at least three yards of fabric as I recall, and the participant, (whose name escaped me shortly after the conference and I’ve been wracking my brain ever since to remember), didn’t want the fabric anymore, and insisted that I take it.  Not one to ever pass up a free addition to the stash, and very confident that this fabric would really be great once I washed it aggressively, I agreed to take it off her hands.  I assumed that the workshop participant was actually the weaver.  Little did I know…

So after I returned from this conference, many years ago, I washed and dried the yardage, as I normally would, seven times.  Nothing happened.  Which led me to finally realize that the yarns were mostly acrylic, and no amount of washing and drying would change the ultimate structure of the yarn.  So I was left with a lovely, poorly sett fabric, for garments purposes, it would have been great for a scarf.  Which means, we go onto plan B.

Plan B would probably require fusing something onto the back of the fabric, like Fusi-Knit or a Texturized Weft product, and then the yardage would be fine for a jacket or vest.  There probably wasn’t enough fabric for a jacket, but all the fall fashion catalogs were showing the cutest tweed skirts with just fringe on the bottom.  My rule for handwoven yardage, is it must be stable enough to support the construction details for the garment design I have selected.  If it isn’t, then I support it in some way, like a fusible interfacing, or possibly the Chanel method of mounting the fabric directly onto the lining with rows of machine stitching, which I outline in my book on Seams and Edge Finishings.skirt

So what if the garment I am making has little in the way of construction details?  What if I made one of those cute little tweed skirts, and interfaced the waistband, and then just let the skirt hang from the waistband, with fringe on the bottom?  I had just enough fabric for this adventure, and I decided that this piece of donated fabric would become a skirt.

I made the skirt up, and put in a drop lining.  I have worn the skirt for years, it is one of my favorites, still in style, with black tights and black boots, it fits neatly in my suitcase, and I just love it.  I always get compliments, even after all these years.  and the sett has held beautifully, no sagging, and I’m thrilled to have been the recipient of the yardage.

So fast forward to the second day of my three day jacket class at the conference last week in California.  I am giving this lecture to my students, and as I tell this story, and pass around the fabric sample I keep in my bag, one of the participants gets the oddest look on her face.  She holds onto the fabric, studying each of the little visible warp threads, and suddenly says to the class, in a sort of embarrassed way, “I think I wove this fabric!”.  We were all sort of speechless, and then once I recovered, trying to figure out how the fabric got from this student in California to a conference in the north east, we started putting together the puzzle pieces.  Some are still missing, because it wasn’t Patricia Martin, my student in the California workshop, who originally gave me the fabric.

patricia_martinApparently she wove a lot of yardage like this about 15 years ago.  A prolific weaver, Patricia has a great eye, and churns out work effortlessly.  This particular yardage, which she became increasingly confident she had woven because she recognized all of the warps used, some were still on her shelf, was one she didn’t particularly like once she was finished with it, and passed it on to some unknown person in some unknown situation, maybe at a guild swap.  How it traveled across the country is still a mystery.

So, I am really thrilled to include Patricia Martin in this blog, she shouldn’t be embarrassed, we all have things we aren’t particularly drawn to, even after we make them, but that doesn’t mean they aren’t wonderful and someone else may think it is the greatest thing since sliced bread.  My only regret is I didn’t weave this, because it is actually one of my favorite pieces of yardage, and one of my favorite skirts to wear.

Take a good look at the jacket that Patricia is wearing in the photo.  Patricia brought to class, three small cuts of handwoven yardage, some with additional shibori dyeing, none of which were enough to make a jacket by themselves, but with a lot of patience, and some creative cutting and piecing, Patricia combined all three pieces of yardage into one wonderful jacket.  There are still a lot of pins holding it together, but she looks terrific, and it gets the gold star for being one of the more creative jackets made in one of my classes.

So I’ve now discovered the original weaver for my skirt.  I couldn’t have been happier.  I am wearing the skirt as I write.  Thank you Patricia, for taking the class, and being a great handweaver, and generously allowing me to tell the story!