What Day is this?

I found myself asking this question often…

I will say, after two nights uninterrupted sleep, I am actually starting to feel human.  And today, for the first time in quite a few days, I felt like my brain was working on all four cylinders.  I felt organized in my thoughts, and felt like I sort of made sense while I was lecturing.  Everyone seemed enthusiastic, and wanted to try out all of the techniques I showed them.  Today’s topic was basic sewing skills and all sorts of Seam and Edge Finishes.

I love the sound of purring sewing machines, and had all sorts of bias strips, nylon tricot, press bars, lopi yarn, and other oddities for the students to play with.  My favorite seam finish of course, is the Hong Kong, and I provided some lovely pink acetate from a bolt I will never finish, to create bias strips for making the Hong Kong finish.  I don’t have all my production photos in this computer, so I can’t actually show you the finish, but I think you can find it in one of my previous blogs.  I also taught them to make piping, and I love to stuff the piping with soft Lopi yarn, every fiber enthusiast has a skein of that floating around in their stash.  It makes great stuffing for piping and I had a ball for them to play with.

One of my other favorite seam finishes was a product called Seams Great.  Sadly this product is no longer available.  In essence, Seams Great was a nylon tricot bias cut strip, about 1 1/4″ wide, which encased a seam allowance beautifully, with no weight and lots of flex.  So I found a source for 15 denier nylon tricot, and offer it to my students, to cut their own bias, and showed them how to use it to encase handwoven seam allowances, and to make curved shirttail hems a breeze.

I also showed them how to make bias tubes with press bars, I use a 3/8″ wide duct fastener, which looks like a cable tie on steroids.  We did all kinds of interesting things with them.

bettie_frontbettie_back
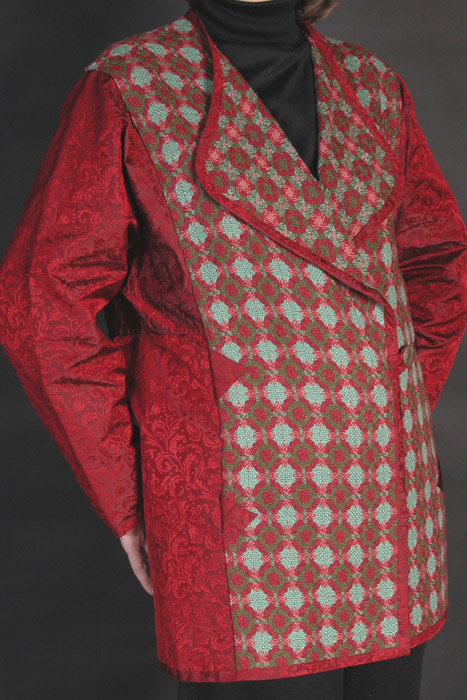
When the class was winding down today, Bettie Bahen from Ann Arbor, MI, who had taken a jacket making class when I visited Ann Arbor last year, came in to show me her blouse.  It was really pretty, and it looked great on her, and she proudly told me that she had used my jacket pattern to draft the blouse pattern!  I was soooo impressed.  She said it was the best fitting pattern she ever used, and that made me feel great!  And I loved the print!

One more day of class, then I get to judge the fashion show!  Tomorrow, Closures…

Comb binding mania!

I am bleary eyed…  All I’ve done for the last couple of days is laundry (smelly clothes from a week at girl scout camp) and print monographs and handouts for the Michigan conference, which is August 5-9.  This is the conference where I have a 12 hour turn around, I arrive home from Colorado late evening next Monday night, and leave Tuesday morning for a direct flight to Grand Rapids Michigan.  But that’s all happening on the 4-5 of August.  Right now we are still in July, so my mantra for the day is, “Don’t project…”

crock2The crock pot is doing its thing, I’ve done shades of bronze, olive, rose, and teal, and today we are cooking a canary yellow.  I’m enjoying this explosion of color, and I can’t wait until fall when I can really play with this wool.  I’m hoping to be inspired hanging around with all the felters for a few days in late August at the Felters Fling. I’ll be teaching a jacket making workshop, and one of my goals here is to make my own “Daryl Jacket” from my own felt…binding_handouts

So, I’ve gone through about $6-700 dollars in toner, and printed reams of paper.  The monographs are handoutsstacked, and the handouts are so big, I’ve forgotten just how big this particular handout is, that I need more 1/2″ comb bind spines.  My wonderful shopper husband is out at Staples as I write.  So I decided to take a break and blog, because I am really bored just punching chads from all this paper with the binding machine…  (Would that I could listen to a book on tape, but alas, I do have to pay attention here, I’ve punched handouts backwards and talk about awkward when you hand someone their handout and oops!)

coverI have so enjoyed reworking my design journal from the last nine years, that I’ve almost finished.  I created a cover from a collage I didn’t end up using for my website home page, but it worked well here.  I only have six projects left to redo, I’ve completed 18 of the projects, each with a two page spread.  I’ve had to dig around in the attic to find scraps of companion fabrics, when I failed to include them originally.  This notebook had mostly the weaving notes, not much was entered once the fabric was finished and I turned the fabric into a garment many years later.  So I’m reconstructing all that, which is an organizational blast, and gluing everything in place.  I took more detailed photos of two of the  projects, in case dear reader, you are interested…

This project was called Softened Edges, and was an 8 shaft deflected double weave from rayon.  I chose a pattern for a jacket that could be reversible since the fabric was two sided.  I used felled seams and bound the edges with a lovely wine colored jacquard silk.

The second project was done on a dare.  I attended the ANWG weavers conference in Pendleton Oregon back in 2003. pg1a pg1bIt was my first time at that conference, and I had been asked to give the keynote address.  It was a wonderful experience, and Pendleton is very charming, and plucked right out of the Oregon trail.  The Pendleton Mill tour ranks up there with my top fiber experiences.  They welcomed the conference attendees, and as a thank you for coming gift, we all got bales of the Pendleton blanket selvedges they cut off after fulling, before they bind the blankets.  These were huge bales, and I talked them into shipping mine home after purchasing a lot of wonderful things from their outlet store.  Some of the local weavers, sick to death of the Pendleton worms, sent theirs home with me as well…

pg2bpg2aSo the dare was to come up with some piece of clothing, since that’s what I do best, made out of the worms.  I ended up weaving a Theo Moorman inlay, where the backing was a wool combination of things in my stash  and the inlay threads a 20/2 rayon, also in my stash.  I wove in the worms, on the surface of the plain weave background, held down by the tie-down threads.  I planned the colors carefully, matching up like “worms” from my bales.  I loved the effect of the color changes, (calling the finished coat “Butterfly“), and ended up constructing the coat by cutting the worm fabric on the crosswise grain.  Since the fabric was too fat and lofty to seam in the traditional way, I cut off the seam website_success1allowances, and used a wool jersey to bind all the edges, connecting the seams together with the jersey.  It is one of the techniques I detail in my Seams and Edge Finishes Monograph.

So back I go for more endless punching of chads…  My husband has returned from Staples. All of these have to be shipped on Tuesday.  I am currently printing the last of the monographs, which is the newest one in the collection, Website Success.  I will offer it for sale on my website, once I give the presentation to those that signed up at the Michigan Conference.  I want to be able to tweak any thing that isn’t completely clear, and I won’t really know that until I give it to a room full of mixed levels of computer experience.  Stay tuned…

The Hong Kong Seam Finish

By popular request, I am posting a tutorial on how to do the Hong Kong seam finish.  If you have my monograph on Seam and Edge Finishes, you already have these directions along with all kinds of other ideas for seam finishes and ways to finish the edges of vests and jackets.  (OK, that was a shameless commercial plug for my monograph…)  If you buy the monograph and also purchase the companion monograph on Closures, you will save $5. and even more on postage since the computer thinks it is one item…

If you have ever taken a jacket class with me, you know what a Hong Kong seam finish is, your jacket is full of them on the inside, and you have the directions in your handout!

Before I get to the tutorial, thanks everyone, for all the birthday wishes, emailed cards, and kind words.  It does my heart good to hear when a weaver gets back to the loom or even better, takes the proverbial leap into yardage!  And for the sewers out there, who haven’t discovered the joy of weaving your own fabric to sew…  Well, you don’t know what you’re missing! 🙂b-1

OK, here is the Hong Kong seam finish!  I love it on an unlined jacket, so professional!

b-3First you’ll need bias strips, you can purchase them, or cut your own.  There is a tutorial for cutting your own bias strips quickly, in my seams monograph. I used a 2″ strip here.  If you don’t know what “bias” means, post a comment! I’ll go into more detail!

With right sides together, place the bias strip on the garment section, with the cut edges even.  Stitch 1/4″ to 3/8″ from the cut edge.  I use the presser foot as a guide. Just be consistent!

b-4

Press the bias strip away from the fabric.

b-5

Press the bias strip towards the wrong side of the fabric, making sure it wraps tightly around the cut edge of the garment section.  This is really important, it must wrap tightly around the cut edge!b-6

Pin securely to keep bias from shifting.

b-7

From the right side of the garment section, stitch in the ditch close to the binding.  Use a color thread to match the garment fabric. (I used black for the tutorial)

b-8

The completed seam “finish”. Note, this is done on the edge of the garment section, before sewing the seam.  You would repeat this step for the other half of the garment, and then sew the seams together.  See first photo!

b-9

You might want to trim the excess binding from the back so it doesn’t get caught when you sew the seam.

Happy Sewing!  And have a great Memorial Day Weekend, we are heading to the shore for a day this weekend, to celebrate the anniversary of scattering my dad’s ashes (he was a Korean War Veteran), and to have what would have been his most favorite meal, an old fashioned Maryland Crab Fest!  (My dad’s birthday would have been on Monday, just three days after mine!) My Maryland sister, the architect, is bringing a bushel of Crabs, my other sister is bringing the beer, and I am bringing fruit to cut up, though I think that was just to give me something to bring, in an old fashioned Maryland Crab Fest, you don’t need anything but crabs and beer, and people around you that you love!  And a lots of rolls of paper towels!