By popular request, I am posting a tutorial on how to do the Hong Kong seam finish. If you have my monograph on Seam and Edge Finishes, you already have these directions along with all kinds of other ideas for seam finishes and ways to finish the edges of vests and jackets. (OK, that was a shameless commercial plug for my monograph…) If you buy the monograph and also purchase the companion monograph on Closures, you will save $5. and even more on postage since the computer thinks it is one item…
If you have ever taken a jacket class with me, you know what a Hong Kong seam finish is, your jacket is full of them on the inside, and you have the directions in your handout!
Before I get to the tutorial, thanks everyone, for all the birthday wishes, emailed cards, and kind words. It does my heart good to hear when a weaver gets back to the loom or even better, takes the proverbial leap into yardage! And for the sewers out there, who haven’t discovered the joy of weaving your own fabric to sew… Well, you don’t know what you’re missing! 🙂
OK, here is the Hong Kong seam finish! I love it on an unlined jacket, so professional!
 First you’ll need bias strips, you can purchase them, or cut your own. There is a tutorial for cutting your own bias strips quickly, in my seams monograph. I used a 2″ strip here. If you don’t know what “bias” means, post a comment! I’ll go into more detail!
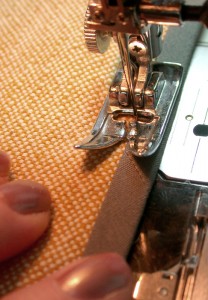
With right sides together, place the bias strip on the garment section, with the cut edges even. Stitch 1/4″ to 3/8″ from the cut edge. I use the presser foot as a guide. Just be consistent!
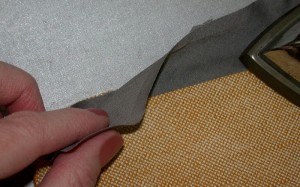
Press the bias strip away from the fabric.
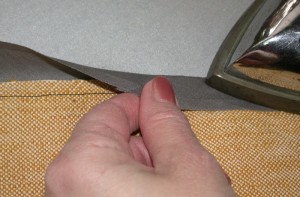
Press the bias strip towards the wrong side of the fabric, making sure it wraps tightly around the cut edge of the garment section. This is really important, it must wrap tightly around the cut edge!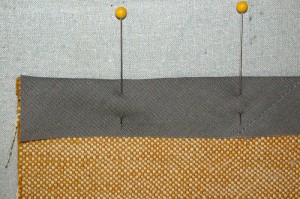
Pin securely to keep bias from shifting.
From the right side of the garment section, stitch in the ditch close to the binding. Use a color thread to match the garment fabric. (I used black for the tutorial)
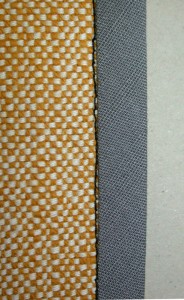
The completed seam “finish”. Note, this is done on the edge of the garment section, before sewing the seam. You would repeat this step for the other half of the garment, and then sew the seams together. See first photo!
You might want to trim the excess binding from the back so it doesn’t get caught when you sew the seam.
Happy Sewing! And have a great Memorial Day Weekend, we are heading to the shore for a day this weekend, to celebrate the anniversary of scattering my dad’s ashes (he was a Korean War Veteran), and to have what would have been his most favorite meal, an old fashioned Maryland Crab Fest! (My dad’s birthday would have been on Monday, just three days after mine!) My Maryland sister, the architect, is bringing a bushel of Crabs, my other sister is bringing the beer, and I am bringing fruit to cut up, though I think that was just to give me something to bring, in an old fashioned Maryland Crab Fest, you don’t need anything but crabs and beer, and people around you that you love! And a lots of rolls of paper towels!

Daryl: happy belated birthday! I love your yard and am jealous of your acreage to garden compared with our California lot. Thank you for the Hong Kong refresher. I’m about to Hong Kong the hem for my silk jacket after deciding to use this technique over a free hanging lining. I do have some silk samples at the two different sets of 60 and 36 epi. I’ll get them to you soon with pix of the finished jacket. I present the jacket at Designing Weavers next Wednesday, then it goes to the San Diego Co. Fair the following day. So… Read more »
Thank you so much for this clear tutorial. I shall investigate Monographs later.
Dianne in cold, wet, winter has set in, New Zealand
Hello Daryl. We share a birthday! My birthday is also on May 22. I am 60 this year and feeling young. I wish you a happy belated birthday and many happy returns of the day.
I send you a big hug.
Rose
Stay warm Dianne! The summer is finally upon us here, we opened the pool this weekend!
very informative
thank you!
I’m looking all over the web for this and still find it confusing – they all say the same thing. Right sides together? I’m assuming this binding is going on the inside of the (jacket) so that would be wrong side, wouldn’t it? I think I can pretty much figure it out for myself but I’m really disappointed how NOT clear instructions are. I’ll keep looking
[…] twofer! Gigi from Daryl Lancaster, fiber artist and blogger from Weaver Sew put together this simple tutorial on making a Hong Kong seam finish. This finish is one of the easiest “couture” finishes you will ever learn. And here is another […]
[…] twofer! Gigi from Daryl Lancaster, fiber artist and blogger from Weaver Sew put together this simple tutorial on making a Hong Kong seam finish. This finish is one of the easiest couture finishes you will ever learn. And here is another […]
Thanks alot , its helpful tip