And in the end she chose black…

Great title for a book…

And this was one for the books…

First, a huge thanks to all of you that took the time to comment about my last two posts.  You can’t know how helpful every comment was, and the best part, was that you didn’t just say, “I like the black”, or “I like the stripes in the middle”, you explained why.  I have an articulate and thoughtful group of readers and it really helped me think about the choices I had and what I really wanted from this piece.

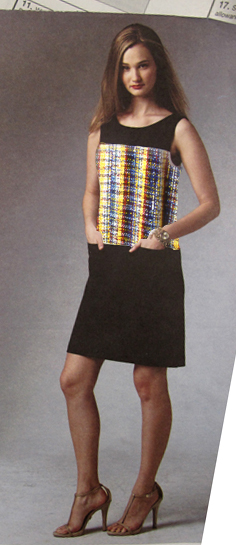
So that said, I did end up using the black linen.  But not the original pattern…

When I first decided to make the bamboo dress, a couple of months ago, I had pulled this pattern from my stash.

Vogue1329

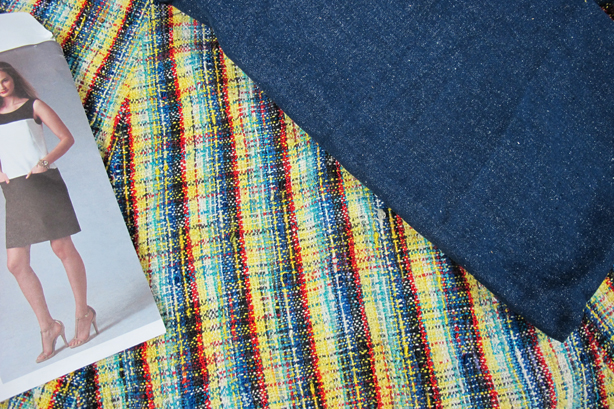
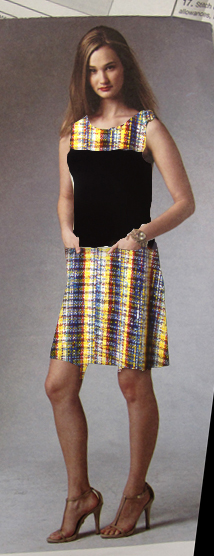
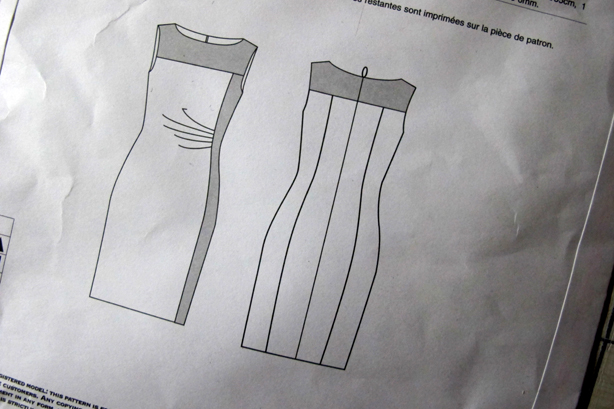
I liked this pattern, from Kay Unger Vogue 1329, and thought it would be beautiful in the bamboo, but since I had three colors in bamboo and the dress was only two colors, I had to mull it over for awhile.  And the black remnant of bamboo I had didn’t quite fit the length of the side panel in this pattern.  When the latest Vogue spring update came through, I found the pattern I actually used, Vogue 1382, and the rest is sort of history.

Vogue1382Vogue1382

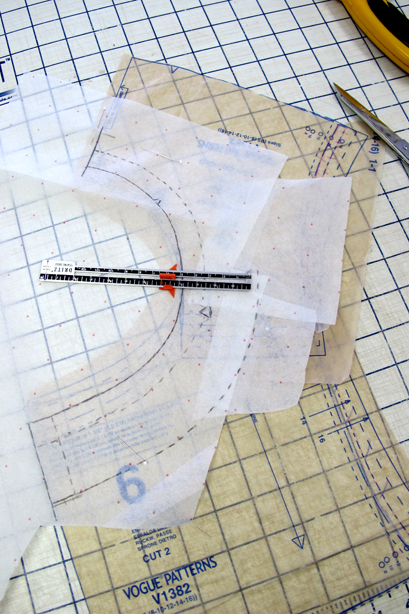
So I’m looking at the original pattern, which I hadn’t actually put away, and suddenly it hit me, what everyone was saying, that the striped handwoven was too chopped up,  and that the black or denim yoke was fine, but wouldn’t it be nice if the handwoven went all the way down from there.  The original pattern made much more sense in this situation.  Except the front panel had this lovely sweep of pleats at the waist, which meant that the upper part of the front panel would be cut off grain.

Vogue1329DetailFrontPanel

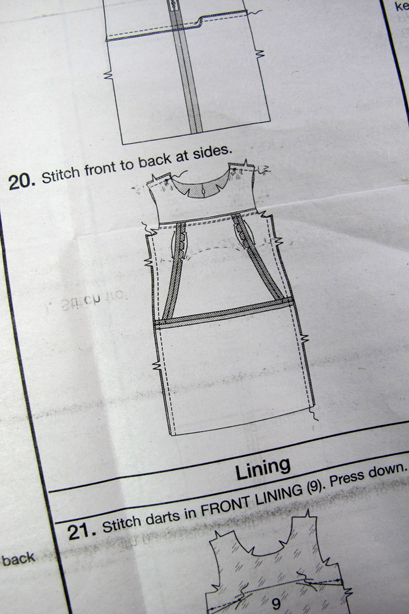
That wouldn’t work for my striped fabric and there wasn’t a panel big enough in the skirt to accommodate it..  And the bulky handwoven wouldn’t pleat in a nice drapey way.  The lining pieces though, were exactly what I needed.  The straight front section, with two little darts for shaping, worked perfectly.

I gathered some reject fabric from the attic, and made up a test garment.  The fit was way off,  and it was interesting to compare the two patterns side by side.  They would appear to be similar in fit from looking at the front of the envelopes, but Vogue 1382, the three sectioned dress, is semi-fitted, so there is much more ease allowance.  It was actually too boxy and had to be taken in considerably.

Vogue1382Vogue1382

Vogue 1329 is close fitting, which is usually reserved for 8th grade prom dresses and knits.  This pattern didn’t seem to be designed for knits, and in fact some of the recommended fabrics were crepe and shantung.

Vogue1329Vogue1329

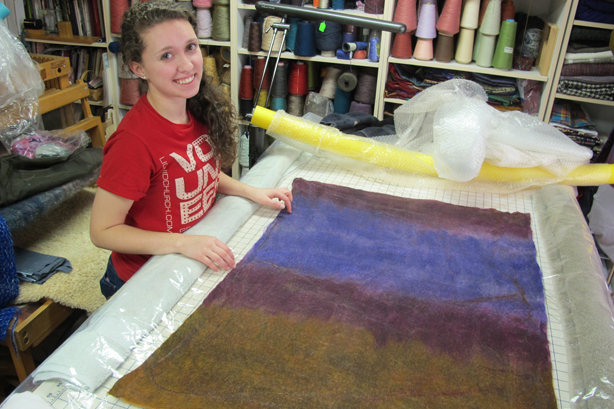
I haven’t worn a “close fitting” dress in years.  I’m almost 60.  So in the Vogue 1382, where I was cutting the upper back down to a size 10, I was drawing the upper back to a size 16 in Vogue 1329.  Who would have thunk it?  Which is precisely why, even though I could be a Vogue fit model, I’m so consistent with their sizing, I still make a test garment or two (in this case two) to check the fit before I cut my real fabric.  I had my lovely intern Jen help me with the fitting.

Here is the second test garment…

Muslin

I read all the comments, and looked at the skirt and the black linen, and then at the silk denim.  And in the end, the black was more formal, more striking, and more unexpected. So I decided it would be the black.

First I carefully cut the entire skirt apart, seam by seam, and pressed each panel.

Pressing

Then I laid out the pattern pieces to see if I could actually get them out of the eight gores of the skirt.  I actually only needed seven.

Layout

In some cases there wasn’t a thread to spare.  I actually shortened the dress to the length of the lining to have enough room.

CuttingOut2CuttingOut1

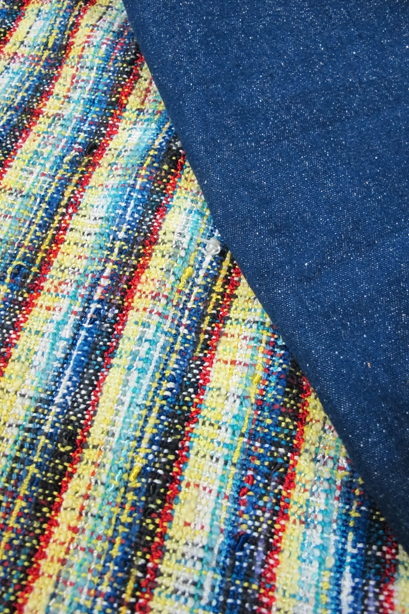
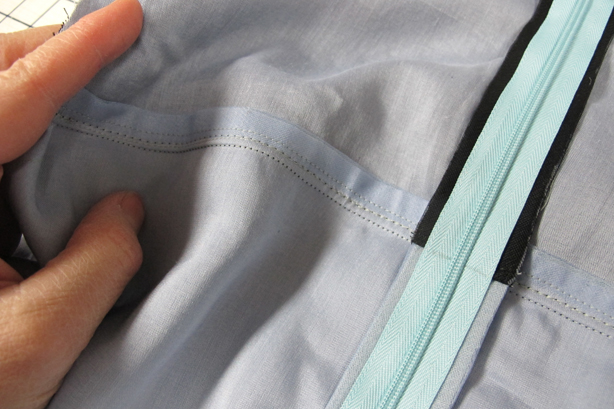
I underlined the black linen with silk organza, and I underlined the handwoven with a fusible tricot.  Here’s the thing.  The handwoven fabric, woven 20 years ago and severely undersett, (I know a lot more now…) was going to give and stretch if not controlled, and paired with linen, which has no give at all, it would be a disaster waiting to happen.  So I fused all the pieces with black tricot, and though it is a little weighty, the handwoven fabric is stable and contained.

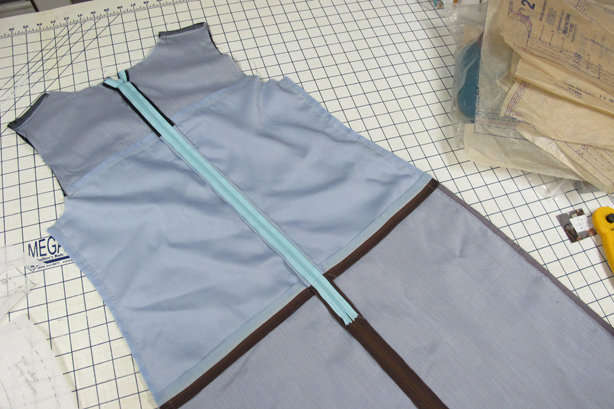
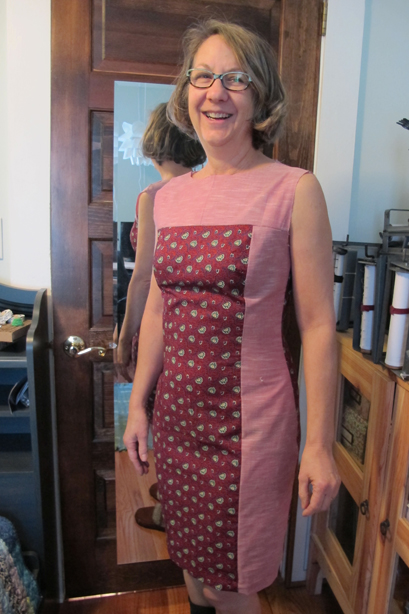
I got the front and back finished in a few hours.

DressFrontAndBack

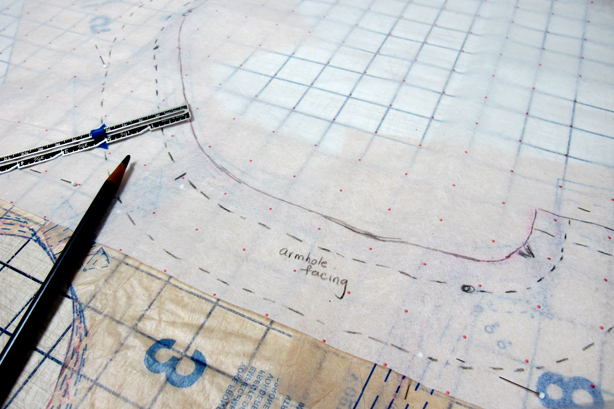
I trimmed all the seams with bias tricot, and because the piece is underlined, again, there was no need to cut a separate lining.  I just needed to cut facings.  So I put the pattern pieces together on the seamlines and traced armhole and neck facings.  I’ll put those in tomorrow along with the hem.

ArmholeFacing2ArmholeFacing

Not bad for a day’s work… (Please note, before you write me letters and tell me I made the dress backwards, remember I’m taking selfies in the mirror…)

FrontBack

Since you asked…

Apparently my dear readers are enjoying this what if sequence I’ve posted and more than one of you suggested I try a different color than black.  So with my trusty and crude, ( I can assure you I didn’t spend a whole lot of time getting every pixel accurate) Photoshop skills, I knocked out another option and it is a pretty cool way to sample if you will, what something might look like in the colors I’ve selected.

First, I made this shearling and silk denim jacket back in December of 2011.  I still have a huge hunk left of the silk denim.  It has a nice texture and it is sort of denim-y color.  Since it isn’t so dark, I thought I’d give it a whirl.

ShearlingCoatBackHandwovenAndSilkDenimHandwovenAndSilkDenim2

Backstory…  I admit.  I was a coloring book junkie.  I just adored coloring books and I’d spend hours getting each picture perfect.  I wouldn’t dare color outside the lines.  So this exercise of combining two images, or in this case three, in Photoshop, is really just a crude version of coloring in my coloring books from my childhood.  My hand was much steadier with the crayon though, I’m a little wiggly with a mouse and the lasso tool.

So here was last night’s options, the handwoven fabric on the top and bottom and in the middle, both photos with a black linen accent.

Vogue1382modifiedVogue1382modified2

And here is tonight’s option, the handwoven fabric on the top and bottom and in the middle, both photos with a silk denim accent.  Keep in mind, this is Photoshop, and I wasn’t careful in matching stripes and giving the appearance of on grain.

Vogue1382modified4Vogue1382modified3


Have at it…

Re-purposing…

I own a good pair of shears and I’m not afraid to use them.  I long ago lost the fear of cutting up my handwoven fabric.  I’ve woven literally thousands of yards of handwoven fabric in my long illustrious career, dating back to the very late 70’s.  Cloth is cloth.  Once it is off the loom it is fair game, though I usually don’t cut it immediately.  Sometimes I’ve waited 20 years to cut something up, but I eventually cut it up.  Not everything I make is a prize winner, and that’s OK.  For me it is all about the journey and the adventure and what I learned from the piece, and if I really like something when I’m finished, I even might wear it for awhile.  And occasionally even a prize winner won’t really be worn much because it is more of a runway piece, and I just don’t have that many places to wear runway pieces.

That said, I’m also not afraid to cut up old work.  Goodness knows the last four months have seen me cutting up lots of stuff from my 1980’s craft fair days, even bagging scraps to sell to quilters and doll makers.  We only live so long, and I have a huge old body of work that will eventually have to go someplace.  So I put stuff out at excellent prices at my guild sale, and various other venues that will take the work, and I am making a dent and moving it along.

Gored Skirtimg333I came across this skirt, woven in 1994.  It has been collecting dust in the back of my closet for a long time.  There is nothing wrong with the skirt.  As a matter of fact, I wore it often in the 1990’s, and have a couple of photos of me wearing it while demonstrating weaving.  I could of course only put my finger on one of them.

It is a mixed warp, done for a sectional warping demonstration.  I remember having a lot of yardage.  This skirt was fun, but no one wears an eight gored nearly floor length skirt anymore.  Certainly not me.  And I’m sure the style will come back around again, but this is one of those pieces, where there is a substantial amount of yardage involved and it could be restyled into something else.  I’ve been mulling it over for awhile.

I’ve recently showed the skirt to a couple of people who have been through my studio.  I mentioned I was planning to cut it up and re-purpose it.  Oh the horrors.  I’ve gotten letters.  Imploring letters not to cut it up.  I’m actually laughing at how passionate people can be.  I’m not.  Passionate about holding onto something that isn’t working for me anymore.

Vogue1382I just finished a really cool dress from bamboo, I showed an almost finished photo of me in it in the last blog post.  The pattern is Vogue 1382 and it is current.  It is an Ann Klein dress, and it turned out really well.  I’ve been staring at the dress, and the pattern and the skirt… 🙂

So to convince everyone that I’m not a complete whack job, I decided to do a quick photoshop representation of what the dress could look like adding a black linen component in the middle.

Vogue1382modified

Then I decided to see what would happen if the colorful handwoven fabric was in the middle and the black were on the top and bottom.

Vogue1382modified2

This is really about composition.  Unlike a painting, where your eye moves around and settles on some central imagery, I don’t want the best part to be over my stomach.   I like the black in the middle, and I think that’s what I’m going to do.  I have the linen pre-shrunk and some black silk organza for the underlining for the middle part, and the skirt has been aggressively washed and machine dried.  I got a bit more shrinkage in the fabric than I got when I originally washed it back in the 90’s, gently, minimal handling and hanging to dry.  I wanted the fabric a bit more stable.  I’ll probably use a fusible underlining on the handwoven part, and see what happens…

On second thought…  Now that I’ve gone over and proofed the blog, I’m really liking the handwoven in the middle.  Who would have thunk it?

Stay tuned…


Carson, Bring me some tea…

If you are not a fan of Downton Abbey, you won’t get the reference, but for everyone else, I wish just once in my life, I can pull a cord and a bell will ring for Carson and I can say the words, “Carson, bring me some tea.”  The closest I’ll ever get is to actually have the bell cord hanging in the place that means the most to me.

Bellpull

I finished the bellpull, and decided that it had to live in my studio so I can dream about 4 o’clock, of a servant coming up and bringing me tea, with just the pull of the cord.  I’m OK with cleaning and keeping my house in order, vacuuming and emptying the trash.  I can cook three meals a day, do laundry and make beds, and tidy up and scrub toilets.  But thinking I can just pull on the cord and summon tea…  Well that brings a smile.  Lady Daryl.  I like…

So we had a bit of a snowstorm here.  About 8 inches.  I daresay I stayed snug in my studio, I only ventured out this afternoon with my husband driving, by then the roads were clear and I went to pick up my monthly box of organic produce.  And my new magnifying glasses.  In addition to my new regular glasses, I had the eye doctor make me a pair of 5+ full frame reading glasses for when I do close hand work. 🙂

Anyway, hunkering down during the storm, I decided to do what any self respecting garment maker would do, I started on my summer wardrobe.  Better than making mohair coats in July.  Sleeveless summer dresses in January. 🙂

The bamboo dress went together like butter.  I made the decision to underline this dress, rather than line it.  There are a number of reasons, all of which I’m putting together in a presentation/lecture for the American Sewing Guild conference in July, in St. Louis, called Behind the Front Line, all about Underlinings.

UnderliningUnderliningDetail

The decision was very successful.  Instead of the full lining though, I would need to cut neckline and armhole facings, which can be anchored to the underlining leaving a clean front and no floppy facings.

NeckFacing

I did however, read through the direction sheet, to make sure I wasn’t missing anything and I came across this step.

Mistake1

Since I knew the dress was fully lined, I was really surprised to see the shoulder seams sewn.  I didn’t think it was possible to put a full lining in a dress with the shoulder seams sewn.  So I read on, to see if there was a new way of doing something I wasn’t aware of.  There isn’t.  Turns out this is a sloppy mistake.  I’m surprised at now poorly Vogue proofs it’s directions sheets anymore.  This isn’t the first glaring error I’ve found in a recent Vogue designer pattern.  The step clearly says to sew the side seams.  It doesn’t say to sew the shoulders.  And the next step is to construct the lining, and then pin it to the dress, shoulders open.  But the first photo shows the shoulders sewn.  No one will die if the shoulders are sewn, they will have to be ripped out to actually line the dress, but still.  Sloppy proofing.  It is a shame.

Mistake2

I haven’t put the facings on yet, nor have I sewn up the hem, but the dress fits like a glove.  I’m totally happy with the fit.  At the last minute I decided to cut a slightly narrower upper back, dropping down to a size ten.  The dress is very boxy and I didn’t like that, so I reshaped it to what I guessed were my contours, hard to do on yourself.  This is where I wish there were two of me.  Oh Carson, where are you when I need you…

(For non Downton Abbey fans, Carson is the head butler…)

Vogue1382

And yes, in the photo I’m wearing tights and fur lined boots.  It is freakin’ 10 degrees out…

Stay tuned…

Perseverance…

I am not a felter.  I admit it.  I adore the loom.  I adore the sewing machine.  I HATE the physical labor necessary to make good felt.  Sigh.  I know I’m going to get letters.  But in reality, I’d rather thread 2000 ends through a loom then spend the hours I just did making panels for the jacket I want to make. And no, I’m not buying a rolling machine…

Backstory…

SpinnersHillCrazyBallIn October of 2010 I attended the NY Sheep and Wool Festival, actually I was teaching but no matter.  I bought the most beautiful “crazy ball” of Corriedale Finn Rambouillet Cross wool dyed by Lisa Merian from Spinners Hill.  It sat in my closet until February of 2013 when I was teaching up in Northern California and found myself in Thai Silks.  They had a sale on certain colors of Silk Chiffon.  I called my son back in NJ and asked for a photo of the crazy ball.  (Forgot I had already posted it in my blog… duh…)  I found a lovely silk chiffon that sort of reminded me of the colors and bought five yards so I could make a felt laminate.SilkChiffon

And so in March of last year, I began to layout the crazy ball over the silk chiffon, planning to make the panels for a jacket from felted wool, partly because I wanted a sample of a jacket made from felted wool, and partly because I really liked the colors.  And I had never made felted panels for a garment.  Silly me.

I have huge respect for felters.  They have arms of steel and a solid constitution, and I am just a lowly weaver who has decent upper body strength for a 58 year old, (I can still stand on my head in yoga) but endlessly rolling felt panels in bubble wrap around a pool noodle is just not my thing.  Before anyone says, “You should have used Merino”, you are correct, I could have probably cut my felting time in half by using Merino fleece, but the crazy balls didn’t come in Merino, at least I didn’t think so back in 2010, and that’s that.  I had what I bought.

So I made the front and back panels, and blogged about it. Here, and here.

And then I moved onto other things.  The novelty wore off and the pile of felting supplies got dumped in the corner and I glared at the pile distastefully every time I had to vacuum around the pile.

And so part of my January 2014 resolution to finish the stuff I’d started was to finish the panels of felt so I could actually construct the jacket and clean up the felting supplies and put them back in the attic where they belong.

I engaged the help of my brand new intern.

JenFelting

I doggedly kept at it, felting two sleeves, two bands and two pocket panels.  I resorted to using the dryer for that last 10% shrinkage.  I found a million things to distract me other than stand there and roll felt panels.  I finished everything this afternoon.

LayoutBandsPocketsFeltingBandsPockets

What I didn’t anticipate was that the beautiful crazy ball was only about 2/3 the colors on the outside.  By the time I got down towards the beginning, there was no periwinkle blue and no burgundy color. What I was left with was largely a pile of combed roving in greeny golds.   So I managed with what I had, and I think I can make this work.  I’m putting the rest of the roving in the “to spin” bag…

PaintedRoving

I pinned all the panels onto the dressform.  I haven’t decided if I like everything or not, but now I’m at the stage that I adore, the make it work stage.  I’m a great garment maker and I am looking forward to turning this pile of wool panels into a garment.  And I’m really thrilled to be finally able to put all the felting supplies away.

FeltedPanels

Meanwhile, I washed the long runner I wove from the leftover 8 shaft Matelassé warp from the Robyn Spady workshop, from May of 2011.  It is really too narrow to cover any of my furniture as a runner in an effective way, but I have this bell pull hardware floating around in my studio from a bell pull I wove out of coarse wool, probably in the late 70’s, probably one of the first things I ever wove on my new Tools of the Trade loom.  I cut off the coarse wool fabric and the hardware fits perfectly on the runner.  It sort of looks kind of cool.  I just have to find some narrow space in my house that doesn’t already have some artwork on it…

BellPullCirca1979MatelasseRunner

And last night, when I could roll felt no longer, I curled up with my knitting, determined to finish a hat I started out of the remnants of fibers from the Abby Franquemont workshop from May of 2012.  I’m on a roll.

Backstory:

I took a class through my weaving guild, on drop spindle spinning, with renowned spindle spinner Abby Franquemont, author of Respect the Spindle.  The class was fun, and Abby gave everyone in the class, all 18 of us, piles of small quantities of various spinning fibers to try.  There were all kinds of wool, handpainted roving, tencel, and silk hankies.  I came home, looked at the pile and in June of 2012, I dug out my electric drum carder and made all of the piles of assorted fibers into four large batts.  Over the next year I spindle spun a couple of the batts into lovely two ply yarn.

AbbyBatts

I saw this pattern for a knitted Tam in a Knit Picks book called Reversible Basics.  What this has to do with Reversibility I haven’t a clue, but I liked the pattern for the Tam.  And I could use a new hat.  The one I’ve been wearing dates back from the mid 1980’s.

Gluhwein

So in between running texts with a couple of girlfriends, I happily knitted my Tam and posted it on Facebook, both in progress and the finished hat (note that cell phone selfies aren’t the best images…).  I like this finishing up of stuff I started way too long ago.  I still have a couple of batts left to spin, and I adore the yarn it makes, but I’m willing to put it away for now and enjoy my new hat…

tam1 tam2

Stay tuned…